Friday, January 29, 2016

Oversized Lace Infinity Scarf


Last week I shared photos of my new oversized lace infinity scarf. Thank you so much for all the kind words and compliments. 

I've been wearing it a lot, and I've been getting compliments every single time. 

A few days ago, in a parking lot of a shopping plaza I met two women who complimented my scarf and asked whether I made it myself. We started talking and they invited me to join a local crochet group that meets once a month. How exciting! It would be wonderful to meet crocheters from my area. The next meeting is this weekend and I hope to attend it. 


I recently made another such scarf. This one is for my friend. It's going to be her birthday present. I like the idea that she and I will have the same scarf, but in different colors.

I used the same yarn (Boutique Unforgettable by Red Heart), but this yarn color is called Cappuccino. I think it will be perfect for my friend.   


The pattern for this scarf is available in my Etsy Shop and my Craftsy Shop.

Wednesday, January 27, 2016

Green Scallops Baby Blanket, My New Crochet Pattern


I would describe my new baby blanket in two words - cute and easy! 

The pattern is very simple. I think it's one of the easiest blankets that I've made. Yet it looks very cute. Those scallops are so neat and lovely. 

The blanket is soft and light.


I used Caron Simply Soft Light yarn. It took three skeins, 330 yards each. The hook I used is G/6 (4.25 mm). And the finished blanket came out about 38 inches long and 29 inches wide. 

The pattern is in my Etsy shop and my Craftsy Shop.


Monday, January 25, 2016

Red Doily for Valentine's Day, Free Vintage Pattern


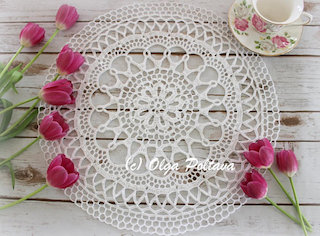
Have you done any Valentine's Day crochet projects? 

I've done one so far - this red doily. I already have a collection of Valentine's Day doilies, but I couldn't help and make one more.

This was a vintage pattern originally called Sundial Doily, from Pineapple Pageant Book No. 252, by the Spool Cotton Company, 1948 


I like this doily, but I'm not very happy with my thread choice. Instead of cotton thread, I used acrylic. This doily is a bit too soft for my liking. I prefer crisp and starched doilies.

My doily came out quite big, 20 inches in diameter.

I post the pattern bellow exactly as it appears in the original publication. 


Starting at center ch 16. Join with sl st to form ring. 

1st rnd: Ch 3, 31 dc in ring. Join. 

2nd rnd: Ch 3, dc in each dc around. Join. 

3rd rnd: Ch 3, dc in same place as sl st, 2 dc in each dc around. Join. 

4th rnd: Ch 3, dc in each dc around. Join. 

5th rnd:Sc in same place as sl st, * ch 3, skip 1 dc, sc in next dc. Repeat from * around, ending with ch 3, sl st in first sc. 

6th rnd: Sl st in next ch, sc in loop, ch 7, * tr in next loop, ch 3. Repeat from * around. Join last ch 3 to 4th ch of ch-7. 

7th rnd: Sl st in next ch, sc in same sp, * ch 4, sc in next sp. Repeat from * around. Join. 

8th rnd: Sl st in next 2 ch, sc in same loop, ch 6, * dc in next loop, ch 3. Repeat from * around. Join last ch 3 to 3rd ch of ch-6. 

9th rnd: Ch 4, tr in same place as sl st, * ch 3, 2 tr in next dc. Repeat from * around. Join. 

10th rnd: Ch 4, * 2 tr in next tr, ch 3, tr in next tr. Repeat from * around. Join. 

11th rnd:Ch 4, tr in next 2 tr, * ch 4, tr in next 3 tr. Repeat from * around. Join. 

12th to 15th rnds incl: Repeat 11th rnd, hav­ing ch-4 between tr-groups on 12th rnd, ch-5 on 13th rnd, ch-6 on 14th and 15th rnds. 

16th rnd: Ch 4, tr in next 2 tr, * ch 5, (3 tr in next tr) 3 times; ch 5, tr in next 3 tr. Repeat from * around. Join (16 pineapples started on this rnd).

17th rnd: Ch 4, tr in next 2 tr, * ch 3, 3 tr in next tr, tr in next 7 tr, 3 tr in next tr, ch 3, tr in next 3 tr. Repeat from * around. Join. 

18th rnd: Ch 4, tr in next 2 tr, * ch 3, holding back on hook the last loop of each tr make 3 tr in next tr, thread over and draw through all loops on hook (clus­ter made), ch 3, tr in next 11 tr, ch 3, make a 3-tr cluster in next tr, ch 3, tr in next 3 tr. Repeat from * around. Join. 

19th rnd: Ch 4, tr in next 2 tr, * ch 5, skip cluster and ch-3, cluster in next tr, ch 3, tr in next 9 tr, ch 3, cluster in next tr, ch 5, tr in next 3 tr. Repeat from * around. Join. 

20th, 21st and 22nd rnds: Work as for 19th rnd, having 2 tr less between clusters of pineapples on each rnd and ch-7 before and after each 3-tr group on 20th rnd, ch 9 on 21st rnd and ch-11 on 22nd rnd. 

23rd rnd: Ch 4, make a 2-tr cluster over next 2 tr, * ch 13, make a 3-tr cluster in next tr, ch 3, tr in next tr, ch 3, make a 3-tr cluster in next tr, ch 13, make a 3-tr cluster over next 3 tr. Repeat from * around. Join with sl st to tip of first cluster. 

24th rnd: Ch 4, make a 2-tr cluster in same place as sl st, * ch 17, make a 3-tr cluster in tr between clusters, ch 17, skip next cluster, make a 3-tr cluster in tip of next cluster. Repeat from * around. Join. 

25th rnd: In each loop around make (5 sc, ch 4) 5 times and 5 sc. Join and break off. Starch lightly and press.

Wednesday, January 20, 2016

California Winter Outfit


One of the things I like the most about living in California is its warm winters. Back in my native Ukraine winter seasons are harsh. Brrr! 


On a warm and sunny day like today, all I needed was a light sweater, jeans, a pair of boots (don't really need boots to keep my feet warm, rather for fashion reasons) and a warm... Hmm, I'm not sure what to call it... An oversized infinity scarf? A cowl? A shrug maybe? Or even a poncho?

Whatever the name should be, I love this new crochet piece! 


It's lacy and light, but at the same time it's warm enough to keep me comfortable on a California winter day. 


I like how bright it is. 

But as I look at these pictures, I think my outfit is lacking one thing - a necklace. A short but chunky piece in a matching color would make my outfit complete. Ha! Now I have a reason to go shopping. 


I hope you all are having a nice day no matter what the weather is like in your neck of the woods.

My new pattern is available here and here


I'm linking this post to
Show and Tell Friday @ My Romantic Home
Link Your Stuff @ Annamarie's Haakblog
Craft Frenzy Friday @ Craft Dictator 
Crafting Along @ Be a Crafter
Home Sweet Home Friday @The Charm of Home,
Cooking and Crafting with J & J @ Julie's Lifestyle

Monday, January 18, 2016

Yarn Review: Snuggly Wuggly Big! by Loops & Threads


Disclosure: This is not a paid or sponsored review. I was not in any way compensated for writing it. I post it because I solely want to share my own opinion.    


This is by far my favorite yarn for baby blankets! If you followed my blog for a while (or simply browsed through it), you probably noticed that I've made tons and tons of baby blankets.


One skien of Snuggly Wuggly Big was enough to make the blanket,
the hat, and the booties. 
 

This is a light weight (category 3, baby sport) 100% acrylic yarn. It is soft and easy to work with. All of my blankets that I've made with Snuggly Wuggly turned out wonderfully, and I didn't regret a single time my yarn choice.


Snuggly Wuggly works well for open and lacy stitches.


The yarn comes in a variety of beautiful solid colors. There are also variegated options for this yarn (thought I personally only have used the solid ones so far).

This yarn comes in two size skeins - a big one (14 oz, 1263 yd) and a small one (5 oz, 446 yd). I always buy a big one as it is more cost efficient.


Green is my favorite color. I loved my green
Snuggly Wuggly blankets the most.


I buy my Snuggly Wuggly from my local Michael's, where it's sold for $9.99.

But as many of you probably know Michael's often offers a 40% and occasionally 50% off for one regular priced items discount coupons. I don't always have coupons printed out with me, but luckily Michael's accepts coupons on smart phones. So whenever I know I'll be running errands and Michael's will be on my way, I stop by to purchase my Snuggly Wuggly. And even if I don't have a printed coupon, I use the one on my iPhone.


This blanket is one of the most popular on my blog. My free
pattern is available.


One thing I wish I could include in my review is my perspective on how this yarn and finished items look like after a few washings. But, unfortunately, I cannot do that. All the blankets I've made so far with Snuggly Wuggly I either gifted away or sold. I've never washed any of them.


Another open stitch blanket. The pattern is available in my shop.

But according to the label, this yarn is machine washable and dryable. However, it should not be bleached, ironed, or dry cleaned.


This blanket is popular for baby boys. The pattern is available in my shop. 

I didn't include the pictures of all the blankets I've made with this yarn. But more than a half of my blankets were made with Snuggly Wuggly. 


Wednesday, January 13, 2016

Preemie and Micro Preemie Baby Caps, Free Crochet Pattern


There are lots of baby hat patterns available on the Internet; however, there are not that many preemie baby hat patterns. So I would like to share my simple pattern for these preemie and micro-preemie baby caps. I know a lot of ladies crochet for charities, so I hope my patterns will be useful.


US Hook size F/5 (3.75 MM)


Light worsted yarn, about 30-40 yards

For the beanies shown above I used Beehive Baby Sport by Patons


Gauge: first 3 rounds = 2.75 inches in diameter


Abbreviations:

ch chain

sl st slip stitch

sc single crochet

dc double crochet


* * Instructions between asterisks should be repeated as many times as there are stitches to accommodate them.


Size: Preemie, about 11 inches in circumference (plus stretch), and 4.25 inches in height


Magic ring.

Round 1: ch 3 (counts as 1st dc), 11 dc in ring; join with sl st to 3rd ch of beginning ch-3. (12 dc)

Round 2: ch 3 (counts as 1st dc), dc in same beginning space, 2 dc in each dc around; join with sl st to 3rd ch of beginning ch-3. (24 dc)

Round 3: ch 3 (counts as 1st dc), dc in same beginning space, dc in next dc, *2 dc in next dc, dc in next dc* around; join with sl st to 3rd ch of beginning ch-3. (36 dc)

Round 4: ch 3 (counts as 1st dc), dc in same beginning space, dc in next 2 dc, *2 dc in next dc, dc in next 2 dc* around; join with sl st to 3rd ch of beginning ch-3. (48 dc)

Round 5: ch 1, sc in back loop only in same beginning space, sc in back loop only of each dc around; join with sl st to 1st sc. (48 sc)

Round 6: ch 1, sc in back loop only in same beginning space, sc in back loop only of each sc around; join with sl st to 1st sc. (48 sc)


Repeat Round 6 until the hat measures 4.25 in height. Fasten off.


Size: Micro-Preemie, about 9.5 inches in circumference (plus stretch), and 4 inches in height


Magic ring.

Round 1: ch 3 (counts as 1st dc), 9 dc in ring; join with sl st to 3rd ch of beginning ch-3. (10 dc)

Round 2: ch 3 (counts as 1st dc), dc in same beginning space, 2 dc in each dc around; join with sl st to 3rd ch of beginning ch-3. (20 dc)

Round 3: ch 3 (counts as 1st dc), dc in same beginning space, dc in next dc, *2 dc in next dc, dc in next dc* around; join with sl st to 3rd ch of beginning ch-3. (30 dc)

Round 4: ch 3 (counts as 1st dc), dc in same beginning space, dc in next 2 dc, *2 dc in next dc, dc in next 2 dc* around; join with sl st to 3rd ch of beginning ch-3. (40 dc)

Round 5: ch 1, sc in back loop only in same beginning space, sc in back loop only of each dc around; join with sl st to 1st sc. (40 sc)


Round 6: ch 1, sc in back loop only in same beginning space, sc in back loop only of each sc around; join with sl st to 1st sc. (40 sc)

Repeat Round 6 until the hat measures 4 inches in height. Fasten off. 

I'm linking to all these parties:
Link Your Stuff @ Annamarie's Haakblog
Crafting Along @ Be a Crafter